It's no secret that even the most uncomplicated details give a simple model a zest, make the product special, unique.

The Burda 7/2018 knit blouse has sleeves with one-piece ties that add lightness and playfulness to the look. How to properly handle such sleeves, we will tell on the example of this lovely blouse.
Master Class- Special offer

- 1
- 2
- 3
- 4
Step 1

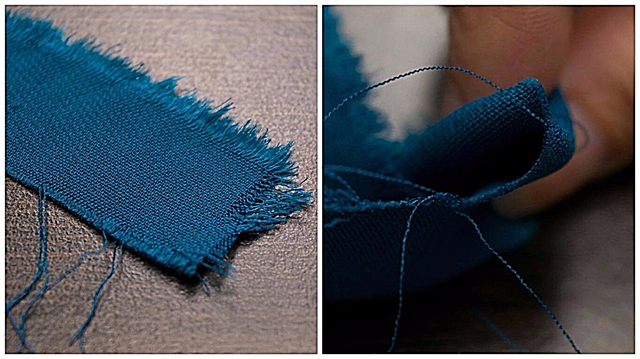
Oblique oblique sections of the stitches of the ties of the sleeves. Stitches to be sewn to one-piece ties with sleeves, ties to the front side. Stitch slices as shown. Cut the seam allowances close to the lines, to the ends of the seams - obliquely to the edges of the allowances. At the corners, cut off allowances to a width of 3 cm. Overlock allowances along the upper cuts of the sleeve parts and allowances at the edges of the cuts of the sleeves to the edges.
Sectional processing of a sleeve with a cuff
Step 2

Unscrew the edges on the wrong side, iron the edges. Place the front parts of the sleeves on the elbow parts of the sleeves with the front side to the front side, chop and grind the upper sections (reference mark 4), ending the seams at the transverse marks (arrow). Fasten at the beginning and at the end of the seams.Iron the seam allowances, iron the seam allowances at the edges of the cuts on the wrong side.
Step 3

Place the front parts of the sleeves on the elbow parts of the sleeves with the front side to the front side, chop and grind the lower sections. Cut the allowances of each seam to a width of 7 mm, overcast and iron in one direction.
Step 4

To overcast allowances for a hem of a bottom of sleeves, to iron on a wrong side and to pin. To stitch the lower edges of the sleeves, ties and the edges of the cuts of the sleeves at a distance of 1 cm, while laying across the ends of the cuts. To turn out a level. Sweep the edges and iron them. Chop open sections.
How to sew different types of sleeves
Now you can stitch the sleeves.
Source and illustration: Burda 7/2018